A cheese board serves many purposes at a gathering (you'll soon learn their immense value):
Choose a board that suits your space (table size), decor and guest number (for larger amounts of guests it might work to create two boards and serve them in different locations). You can also use this to separate known allergens onto a different board such as nuts, or dietary preferences for your vegetarian and vegan guests.
Our Oliver Deluxe Board is a crowd favourite with its large diameter and beautiful teak wood grain. Personalised just for you, it is bound to impress your guests!
Before we get into the food, you first need to think about how you will be serving everything. Dips, olives and soft cheeses like bocconcini require a little more thought that just placing them on the board. Keeping dips in their plastic containers is never a great look.
Place your small serving bowls on the board to see what space you have left. It is also a great idea to get out your serving spoons and cheese knives. Our Rosie teaspoons are perfect for dips and tapenades.
At this point, fill your serving bowls with dips and set aside for placement with the cheese when you're ready to assemble.
Cheeses get their own category because there are many ways you can attack them. We like to have a combination of soft and hard cheeses available to a) make the platter more visually appealing and b) meet a variety of cheese preferences.
A good cheese board will have at least 1 hard cheese, 1 soft cheese and 1 alternative cheese.
Hard Cheese options include:
Soft Cheese options include:
Alternative Cheese options include:
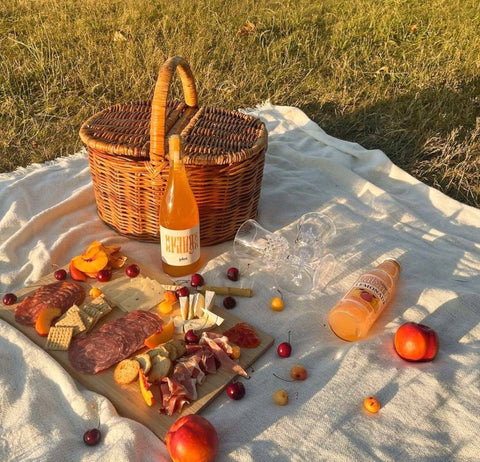
Think about the way you'll be serving your cheese for ease of grabbing. Hard cheeses work well pre-cut so that guests can simply grab and go. We've sectioned our vintage cheddar into two sections as it's often the go to cheese in the image below.
To elevate your cheeseboard to a charcuterie board, you need to add a selection of meats.
The way you choose and display your meats will depend on a few factors:
Our recommendations include traditional European cured meats such as:
A mix of spicy and mild is always a great idea!
If cheeses, meats and antipasti are the finishing touches, then crackers and bread are the foundation of a good cheese board. Almost everything on your board will require a nice carb to rest on, so high quality breads and crackers are important.
The options are very much dependent on your choices above, which is why we've put this section last. Crackers are appropriate for almost all cheeses and dips, and a variety of water crackers, lavosh and grissini will be sure winners.
If your meats above are quite large (think long pieces of prosciutto) it may be useful to include small pieces of bread such as a cut up baguette or torn loaf.
]]>We are here to bring you stocking fillers, KK ideas and other gifts all to suit your budget this year! Amazing and thoughtful gifts do not have to break the bank.
Each selection is organised by price from lowest to highest, happy browsing!
]]>Each selection is organised by price from lowest to highest, happy browsing!
A personalised Christmas ornament from $4.
2 Personalised Heat Mats for $10.
A Personalised Glass Jar for $15.
A Personalised Florence Luggage tag for $15.
A Personalised Capulet Keyring for $15.
2 x Rosie Teaspoons, available in a range of colours for $7 each.
A Personalised Mini Robin Cheese Board for $20.
A Christmas Decorating Pack for $20.
A Baby Essentials Kit, available in 4 colours for $30.
A Charlie Display Tray for $30.
4 Personalised George Slate Coasters for $30.
A Personalised Delilah Dog Lead for $30.
A Personalised Molly Tea Infuser for $25.
A Personalised Jack Bottle Opener for $25.
A Baby Nursery Sign for $45.
A Jane Silk Pillowcase for $50.
A Set of 4 Luna Linen Napkins for $40.
An Alphabet Card Set for $40.
A Personalised Large Robin Cheese Board for $45.
A Charlotte Baby Memory Box for $75.
A Charlotte Wedding Memory Box for $75.
A Personalised Lucy Baby Abacus for $80.
A Personalised Oliver Deluxe Cheese Board for $99.
]]>Christmas is the time for gifting, whether that be through physical gifts, gifts of service or spending quality time with your loved ones. We have rounded up a gift for each person on your naughty or nice list to make this gifting season easier and to help you treat your loved ones to a gift they will love and remember for years to come.
Dad:
Dad is an enigma. Dad has everything, and nothing, all at the same time. We get it, dads are hard. Our Peach and May dads are no exception. Dads love to know you put effort in so we are sure you'll impress him with these recommendations.
For the dad who loves a drink
For the Gordon Ramsay dad
Mum:
What do you get the woman who has literally kept you alive for decades, loves you more than anything, and deserves the world (but you can't afford that)? Make her feel special. Mums don't want expensive gifts, they want to be celebrated and remembered.
For the young male:
I get my brother clothes every year so this year I will be shaking things up, if this sounds like you keep reading.
For the young female:
If you are a brother reading this, your sister deserves a nice gift for organising all of the gifts for everyone else in your family.
These gifts are also perfect for your best friend, make sure she knows how much you love her!
Furry Friends:
This year was hard for everyone except our furry friends. They had unlimited attention and love for months. As we move back to normal, don't forget about your furry loves and treat them to a very special gift.
In-Laws:
Buying a gift for your in-laws is hard! Whether they remind you of the parents from Everybody Loves Raymond, or they're more of a Mr and Mrs Brady, you want to get them something they'll love!
Extended Family and Work Colleagues:
For the next tier in gift giving, it is important to find something meaningful without the added expense. As our Christmas lists grow over the years it can be hard to budget for the gifting.
The Work KK:
KK gifts are stressful! Sometimes you draw a name out and you're not even sure where they sit, what their coffee order is or which department they work in. (No judgement here). At the same time you have a budget to adhere to. We have rounded up some budget friendly, thoughtful gifts that are KK fool-proof.
Thank you for reading our gift guide, we hope it helped you cross a couple of gifts off of your list this year! As a thank you, enjoy 15% off on your next purchase. Use the code: PEACHYFAN82 at check out.
]]>Today's pick is cold brew. Any high quality café will likely have cold brew on their coffee menu, which up until recently I assumed was just marked up iced coffee. Here is an easy guide on how to make your own!
Cold brew is exactly what the name implies; a way of brewing and extracting flavours from coffee beans by using cold water, as opposed to hot water through traditional methods like espresso or pour-over.
What are the benefits of brewing coffee with cold water?
The cold brew method is great as it's versatile enough to create either ready to drink cold coffee or a concentrate that you can add water to.
The best ratio for ready to drink cold brew is 1:15. This means that for every 1 gram of coffee, you want to use 15mL of water. I typically grind 100 grams of coffee and use the iced tea jug above to brew it in 1.5L of water to maintain this ratio.
If you want to create a concentrate you can add water to after it's been brewed, simply adjust the ratio above and add the water in after. I.e. if you use 100grams of coffee and 500mL of water, you have produced a concentrate in a ratio of 1:5. Simply pour your concentrate into a cup and add twice as much water to bring it back to the drinkable 1:15 ratio.
Coarse coffee is best for cold brew. We want to extract flavour from the coffee over time, without it seeping through our strainer and adding sediment to the cold brew.
If you are a coffee enthusiast and love to grind your own beans, then in this case the coarser the better. I used my Breville Smart Grinder Pro on the coarsest setting of 60. Typically an espresso grind would be much more fine, so keep this in mind when you are adjusting settings on your automatic or manual grinders.
If you are purchasing your coffee pre-ground, again it is important to make sure it is quite coarse. My tip is to go to a local café that sells beans and ask if they would coarse grind you some beans that you purchase from there. In my experience they'll often be more than happy to do this and you get to taste some high quality beans for your cold brew!
Anything that is ground for espresso machines will usually be too fine, however there are plenty of coarsely ground options. Below is an image of typical espresso grounds on the left, and the much coarser cold brew grounds on the right. Both are shown on our Matilda Cheese Board.
Finely ground coffee (above) used for espresso.
Coarsely ground coffee (above) is great for cold brew.
However you decide to grind your beans, what is important is proper storage. Coffee beans can quickly go stale when exposed to oxygen, and this happens much faster for pre-ground coffee. We store all of our coffee beans in our Elizabeth Glass Jar as the airtight seal keeps beans or grounds fresh.
As covered in step 1, it's important to know how much coffee you're going to be using. In my method, I measure that my grounds are equal to 100grams, which fits nicely in my strainer. Keep this number in mind so you know how strong you've made your cold brew.
Add the grounds to your sieve and place it in your jug.
Measure out the amount of water you want to use, remembering this makes up the second part of our ratio. Filtered water is preferable, but any room temperature clean water will work well. In my case, I measured out 3x 500mL jugs to make sure that my cold brew was 100grams of coffee to 1.5L of water, leading to a drinkable 1:15 ratio.
Pour this water through your sieve and into the jug to begin the extraction. You may have to do this in stages to avoid overflowing the sieve as the water will pass through the grounds slowly.
The entire extraction process will take approximately 24 hours. Leave your jug in a fairly cool place, like a kitchen bench top, preferably out of direct light. Make sure your sieve with the grounds are still inside.
After 24 hours, remove your sieve with the grounds and transfer your jug to your fridge. The extraction is now fully complete and you'll notice that the water has developed a deep, dark coffee colour over the brewing time. The jug can stay in the fridge for about 7-10 days.
Get a cup with some ice and pour that beautiful cold brew into it. If you're someone who enjoys iced coffee, you'll likely notice that cold brew has a much cleaner taste, with less sour or bitter notes compared to espresso over ice.
By mixing in a bit of milk, you now have ready to go cold brew that you can use to make an instant iced latte, saving you time and money over these warm months!
I've been using my Molly Tea Infuser by removing the tea strainer and adding my cold brew and some oat milk in the morning before heading to work. It saves me about $7 per day and tastes much better!
]]>If you are in your twenties or thirties right now then there is no doubt that your social feeds are flooded with pregnancy announcement and gender reveals.
Do not stress, we have you covered on what to gift the bub and parents-to-be. So whether you are a baby newbie or a lover of all things baby, have a browse of this list for some gift inspiration.
Events you should take a gift to:
1. Baby Shower
2. Birth or First Visit
3. Christening/Baptism
4. 1st Birthday
Personalised Gifts: A personalised gift shows that you put effort into the present and will be a winner with the parents. We work pretty quickly at Peach and May so don't stress about the timing of finding out the name of the baby, we can get it done for when you need it!
Practical Gifts: These gifts are exactly what the parents-to-be need!
2. Lily Bib
3. Or bundle both together with Baby Essentials Kit
Unique Gifts: Presents they won't receive from anyone else!
]]>Step 1: Set the Scene
Before you even think about writing a grocery list or getting out the vacuum, think about what 'vibe' you want from the event as this will impact all of the decisions made.
Summer Lunch: For a relaxed, daytime event you might opt for an alfresco setting with a mixture of seating styles. Think floor cushions, outdoor lounges or even adding cushions to your retaining walls. Grab a portable speaker and choose an upbeat playlist (Examples on Spotify: Summer Throwbacks and Summer BBQ). Summer styling also calls for bright colours, natural textures and lightweight fabrics. Pair our Luna Linen Napkins in Light Beige with wooden accents in your serving boards (Example: Leonardo Pizza Paddle or Long Robin Cheese Board). Decorations could include paper lanterns, bright florals and coloured candle sticks.
Image: Jessica Nguyen
Elegant Dinner Party: For a sophisticated soiree (yes we are at the age where we now have soirees) we want moody lighting, mature colours and a retro playlist (our favourite is this Spotify one). Pair our Luna Linen Napkins in Dark Olive with tapered candles and the Charlie Display Tray in Black. On your tray you could put a decanter, scotch glasses and some nuts and olives. You also need the ultimate cheese board (Oliver Deluxe Cheese Board) because after dinner adults don't have dessert, they have cheese and wine.
Image: Platings and Pairings.
Step 2: Choose the Menu
Menu choice should be reflective of your scene! So ensure there is a correlation between the vibe you want and the food you are serving up.
Ladies Brunch: Call over your best girlfriends for a chic and tasty brunch. Style with pastels and lots of natural light! Our Luna Linen Napkins in Dusk Pink would work here as would our Rosie Teaspoons in a range of colours!
A brunch menu should be a combination of sweet, savoury and easy to eat (we want our guests to keep the food on plates and off cute dresses - this is where the napkins come in handy).
Suggestions:
- Chocolate Chunk Chai Banana Muffins
- Spinach and Ricotta Stuffed Mushrooms
Finish it off with a DIY Mimosa bar and you are set!
Step 3: Coordination
I get it, the planning is fun, the day of/before is not! The stress sets in and you forgot an ingredient on your grocery shop, your soufflé isn't rising, the toilet isn't cleaned and the guests will be here any minute. This is where a little pre-event organisation comes in handy (to avoid the hurdles, or at least make them easier to jump!).
The Week Before:
- Write your grocery list (check what is already in your pantry/fridge) and buy the non-perishables.
- Wash your linen and locate any other styling pieces you need - gather these all together in a free space ready to go.
- Check the weather - make amendments to your setting if needed (add blankets and hot chocolate or buy paper fans and stock up on ice).
1-2 Days Before:
- Buy perishable items and prep any menu items that can be prepped (Roll the arancini, make the pasta sauce, etc). Anything that you can avoid doing on the day should be done!
- Put drinks in the fridge.
- Clean the house! If you have no children at home, you might even be able to do some Stage 1 setting up!
- Pick an outfit, you won't have time for this later.
- Write a list of each menu item and the time they take so you are prepared.
Day Of:
- Cook anything that still needs to be cooked.
- Buy ice if needed and fill an ice bucket for easy access by your guests.
- Light tidy up of the house, light a candle in the bathroom and replace the hand towel. Finish up your styling and decorating.
- Get platters and serving boards ready.
- Wash up straightaway, no matter how tempting it is to leave everything!
30 Minutes to 1 Hour Before:
- Get dressed! Don't forget this step.
- Put music on! Remember Step 1.
- Enjoy your event! Now is the fun part.
]]>
When I moved out into the world and no longer could rely on mum and dad, most of my washing knowledge came from the usual myths you hear:
Pretty quickly I had to learn that colours, for the most part, rarely run with modern washing powders. A stray sock will not ruin a full load of crisp whites.
The dryer will not shrink everything if it's washed properly and on the correct setting. Avoiding the dryer is only the case for some specialty fabrics (see below).
Water temperature is VERY important depending on fabrics. Your socks and undies may sit in the same drawer, but that does not mean they should share space in the washing machine.
Washing quickly becomes fairly simple for 90% of your wardrobe, bedwear and table linens. However, it's that final 10%, the specialty pieces that add a touch of class to your home that require the most care and are easiest to turn scratchy, faded and unusable.
Read below for how to not only care for these fabrics, but get the most out of them so they actually improve over time.
100% silk pieces are easy to identify, they're smooth, stay cool in warm temperatures and are great at repelling dust and germs. It's also easy to spot some silk that hasn't been cared for properly. It develops a scratchy feeling, clings onto dust easily and in some cases will shrink up to 15%.
Our Jane Silk Pillowcase can be cleaned using the information above, and is great for keeping your hair and skin clean and fresh.
Linen is one of the oldest fabrics in the world, widely used over 8000 years ago in Ancient Egypt. It's no wonder this fabric has stood the test of time. It's one of very few fabrics that, if cared for correctly, actually improves over time.
My wardrobe and kitchen is full of linen, it's lightweight, buttery and softens over time with each wash. Linen pieces are a summer staple everyone should own.
Our Luna Linen Napkins are triple washed and treated in a softening solution, so we've already begun the journey to softer linen for you!
Hopefully this blog helps to preserve some of your items and get the best out of all the special items you own.
Keep posted for next week's Peachy Picks!
]]>You will need your Molly Tea Infuser to make the drinks in. Our infuser can be used as a regular water bottle, but also as an infuser with the use of the tea basket.
We don't need to tell you why hydration is important, but we can tell you how to make your water intake more enjoyable!
This recipe is great for hydration! Cucumbers promote hydration and are high in Vitamin K. The limes contain antioxidants and high levels of Vitamin C. Finally, mint can help clear your nasal passages and increase alertness.
Ingredients:
This recipe can help settle your stomach and ease digestion. Rosemary is known for its calming properties and anti-inflammatory compounds. Blueberries are considered an antioxidant superfood and lemons contain high amounts of Vitamin C and soluble fibre.
Ingredients:
The one you were hoping for on the long weekend! Yes, this recipe can ease your hangover symptoms. Oranges contain Vitamin C and will help to boost your immune system whilst the mint can help freshen your breath and increase your alertness to fight fatigue.
Ingredients:
This recipe is great for glowing skin and cell regeneration. Both lemons and strawberries contain Vitamin C which is great for skin protection and rejuvenation. Basil contains compounds which are known to increase your ability to think clearly.
Ingredients:
Hydration keeps your body functioning at optimal levels. Both watermelon and cucumbers have a high water content and help promote a healthy gut. Citrus fruits have many benefits for your hair and skin, and overall health. We used the new T2 Citrus Zing Cold Brew teabag in our tea infuser basket/
Ingredients:
]]>
Welcome to the first release of Peachy Picks. Each week we will release a topical article to help you better curate your life and live the Peachy way!
This week we are discussing all things PICNICS. If you are from Sydney you’ll know that all we’re allowed to do at the moment is picnic, so why not do it in style?
We've listed these two together because they're equally important to styling the best picnic. Whilst you can't go wrong with a classic wicker picnic basket, you can look to add your style in the form of an alternative blanket. Think moroccan rugs for pops of colour or lightweight cotton blankets for an airy relaxed feel.
Before you can plan or dig into the food, you need to consider how you'll display everything. In a world where the highlight of your month is sitting on a blanket in a park for a few hours with a friend, you have to make the most of your space with the appropriate setting.
We recommend either the Oliver Deluxe Cheese Board or Robin Long Cheeseboard to set all of your snacks and avoid a mess of bags and containers on your blanket. Share directly off the board or purchase some bamboo disposable utensils and plates for a simple, eco-friendly way to avoid additional cleanup.
Coming into spring, the warmth calls for refreshing drinks and fresh fruit to keep you feeling cool through your picnic. We recommend a cool iced tea in our Molly Tea Infuser, along with watermelon, mango and all of the Australian summer classics. Pastries are a great choice to include, especially if starting off with a morning session.
With the government allowing alcoholic drinks at even more picnic locations over the month of October, now is the perfect time to grab a few seltzers or premix some cocktails and kick back for an extended session in the afternoon sun!
We have rounded up the 5 best picnic aesthetics on the ‘gram this week to help inspire your next weekend outing.
Aesthetic picnics to inspire you:
2. Plot Wines
]]>